Install Munin Monitor Bind DNS on CentOS 6.4
วันจันทร์ที่ 29 กรกฎาคม พ.ศ. 2556
Install Munin Monitor Bind DNS on CentOS 6.4
วันพฤหัสบดีที่ 25 กรกฎาคม พ.ศ. 2556
CentOS Samba for Windows BareMetal Backup
เริ่มกันเลยดีกว่าครับ
Install
$yum install samba samba-client samba-common
$chkconfig smb on
$chkconfig nmb on
นิดหนึ่งที่ลืมไม่ได้ก็อย่าลืมปิด Selinux กันน่ะครับเดียวไม่ work ขึ้นมาหาว่าไม่เตือน
IPtables configure
เพิ่มเข้าไปในส่วนของ /etc/sysconfig/iptables
$nano -w /etc/samba/smb.conf
#======================= Global Settings =====================================
[global]
workgroup = ITDEEDEE.local
security = share
map to guest = bad user
#============================ Share Definitions ==============================
[Backup]
path = /Backup
valid users = Userbackup
browsable =yes
writable = yes
# guest ok = yes
oplocks = no
force create mode = 775
force group = smbgrp
directory mask = 775
force direcotry mode = 775
$service smb restart
$service nmb restart
เราก็เอา User: Userbackup แล้วก็ Password add to Domain Controller แล้วก็ Add member ( Domain and Backup Operators)
แล้วก็ทดสอบด้วยการ เข้า \\server1 บน Windows เพื่อต้องการ back up.
ทีนี้เราก็ใช้ windows backup baremetal บน Windows backup ไปที่ share drive ได้แล้ว
วันเสาร์ที่ 2 กุมภาพันธ์ พ.ศ. 2556
How to resize LVM Logical Volumes on Centos 6 using format type ext4.
มาเริ่มกันเลยดีกว่าครับกับ วิธีการ ปรับขนาด Partition Linux
Step 1: Reboot เครื่องแล้วเข้าสู่ safe mode ของ linux กันเลยนะครับ
#lvreduce –L 2G /dev/mapper/vg_test-lv_tmp ;ปรับ ขนาดให้ Logical Volumes เป็น 2 G ครับ
สิ่งที่ควรระวัง: ต้อง Backup ข้อมูลการ การขยาย พื้นที่นั้นไม่น่าเป็นห่วงเท่าไหร่ เพราะจะไม่มีผลกับข้อมูล แต่การ ลดขนาดของพื้นที่นั้นจะทำให้ข้อมูลสูญหายได้ ต้องBackup ก่อนครับสำคัญมาก
วันพุธที่ 8 กุมภาพันธ์ พ.ศ. 2555
How to delete old files.
Ex:
First we need to fine files older than 10 day :
$find /PATH/* -mtime +10
Second we nedd to fine files older than 5 minutes and delete it:
$find /PATH/* -mmin +5 -exec rm {} \;
How to dump Mysql
Ex:
$mysqldump -uroot -p'xxxxx' databasename > /PATH/databasename.sql
-u is mean user
-p is mean password
databasename mean databese for need to dump
Restore database:
Ex:
$ mysql -uroot -p'xxxx' databasename < /PATH/databasename.sql
วันอาทิตย์ที่ 22 มกราคม พ.ศ. 2555
Jail break IOS 5.0.1
วันพุธที่ 3 สิงหาคม พ.ศ. 2554
Message:The features supported by the processor(s) in this machine are different from the features supported by the processor(s) in the machine on whi
เข้าผ่าน SSH ไปยัง directory ที่เก็บ host ครับ แล้วหาไฟล์ นามสกุล .vmx เพิ่มโค้ดด้านล้างเข้าไป
checkpoint.disableCpuCheck = "true"
ครับแค่นี้เป็นอันจบครับ
วันจันทร์ที่ 1 สิงหาคม พ.ศ. 2554
How to get Dell Service Tag on Windows System in Console
Use WMI on Windows to get service tag as shown below:
C:\Users\john>wmic bios get serialnumber
SerialNumber
ABCDEF1
And We Use WMIC command will give make and model number along with service below:
C:\Users\john>wmic csproduct get vendor,name,identifyingnumber
IdentifyingNumber Name Vendor
ABCDEF1 PowerEdge 2950 Dell Inc.
วันเสาร์ที่ 30 กรกฎาคม พ.ศ. 2554
FastSCP
สวัสดีครับ
หายไปนาน เลย ไม่ได้อัพเดจบทความ วันนี้ขอนำเสนอโปรแกรมที่ช่วยในการย้าย vm hosts ใน esxi กันนะครับ ก็หาก เราใช้งาน esxi อยู่นี่ก็ฟรีอยู่แล้ว แต่ไม่มีเงินซื้อตัว v center ก็สามารถใช้ตัวนี้แก้ขัดไปได้
นั้นก็คือ Veeam FastSCP
โปรแกรมตัวนี้ดียังไง ผม ว่าหลายคงเคยเจอ เวลาจะย้าย vm hosts ต้องหา hdd external มาก๊อป ไฟล์ ต้องมา mount partition ให้กับ HDD external อีก หลายอย่าง โปรแกรมตัวนี้ช่วยได้ครับ สมมุติว่า เรามี esxi ใหม่ กับ ตัวเก่า เราต้องการย้าย host จากตัวเก่าไปตัวใหม่ ก็แค่ ให้เจ้าตัว FastSCP เชื่อมต่อกับ server esxi ของเราทั้งสองตัว แล้วทำการลากไฟล์ ข้าม มาเลย อย่างง่ายดายเลย ครับ
แต่มีข้อแนะนำนิดหน่อยนะครับเวลาใช้เราควรสร้าง vm บน esxi ปลายทางไว้ก่อน แล้วค่อย ก๊อปปี้ไปวางทับจะทำให้ไม่ได้วุ่นวายกับการสร้าง vm ทีหลัง เพราะ esxi ไม่มี import host เข้ามา เนี้ยซิ
โปรแกรมตัวนี้ อาจจะไม่มีที่สุดนะครับในการจัดการ esxi แต่มันถูกครับ
วันพฤหัสบดีที่ 10 กุมภาพันธ์ พ.ศ. 2554
How to force yum update command to Exclude certain packages
nano -w /etc/yum.conf
and add line:
exclude=kernel*
It should look like as follows:
[main]
cachedir=/var/cache/yum
keepcache=0
debuglevel=2
logfile=/var/log/yum.log
distroverpkg=redhat-release
tolerant=1
exactarch=1
obsoletes=1
gpgcheck=1
plugins=1
exclude=kernel*
# Note: yum-RHN-plugin doesn't honor this.
metadata_expire=1h
# Default.
# installonly_limit = 3
# PUT YOUR REPOS HERE OR IN separate files named file.repo
# in /etc/yum.repos.d
And we can skip yum command updates on command line using as below:
#yum --exclude=kernel* update
วันพฤหัสบดีที่ 6 มกราคม พ.ศ. 2554
What is SSL and what are Certificates
1. A browser requests a secure page (usually https://).
2. The web server sends its public key with its certificate.
3. The browser checks that the certificate was issued by a trusted party (usually a trusted root CA), that the certificate is still valid and that the certificate is related to the site contacted.
4. The browser then uses the public key, to encrypt a random symmetric encryption key and sends it to the server with the encrypted URL required as well as other encrypted http data. 5. The web server decrypts the symmetric encryption key using its private key and uses the symmetric key to decrypt the URL and http data.
6. The web server sends back the requested html document and http data encrypted with the symmetric key.
7. The browser decrypts the http data and html document using the symmetric key and displays the information.
Several concepts have to be understood here.
Refer http://tldp.org/HOWTO/SSL-Certificates-HOWTO/x64.html
วันจันทร์ที่ 20 ธันวาคม พ.ศ. 2553
TTL (Time To Live)
Reply from 222.123.23.55: bytes=32 time=8ms TTL=62
TTL 64 จะบอกว่าเป็น linux, Routerเล็ก
TTL 128 จะบอกว่าเป็น Windows
TTL 254 จะบอกว่าเป็น Router ระบบใหญ่ๆ
หากสังเกตลักษณะ ที่เกิดขึ้นคือเมื่อเราทำการ ping ออกไปแล้วค่ามันไม่เท่ากับค่าข้างต้นนั้นหมายถึงมันวิ่งผ่าน Routerไป
อย่างเช่น
Pinging www.xxx.com [222.123.23.55] with 32 bytes of date:
Reply from 222.123.23.55: bytes=32 time=8ms TTL=62
หมายความว่า วิ่งผ่าน Routerไปสองตัวนั้นคือ 64-2
วันจันทร์ที่ 13 ธันวาคม พ.ศ. 2553
Linux command: What is my IP? (Public IP address)
http://www.go2linux.org/what-is-my-public-ip-address-with-linux
curl -s checkip.dyndns.org|sed -e 's/.*Current IP Address: //' -e 's/<.*$//'
วันเสาร์ที่ 11 ธันวาคม พ.ศ. 2553
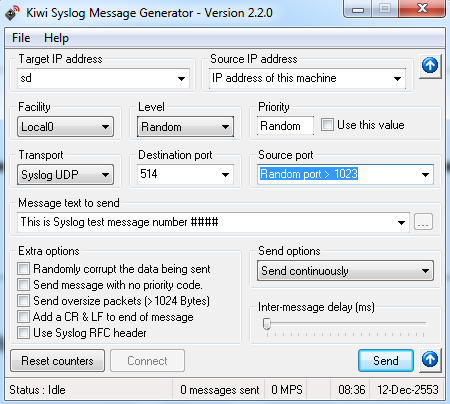
Kiwi SyslogGen 2.2.0
หลายครั้งที่เราทำ Syslog Server ขึ้นมาแล้วบางทีกว่าจะ test ได้ต้องเข้าไป config device ให้ pointมาที่ Server เรา แล้วก็ต้อง ทำหลายตัวด้วยซิเพื่อให้ได้ผลที่น่าพอใจ พอดีด้วยความอยากได้ Generator syslog ก็เลยลองหาดูปรากฏว่าเจอตัวนี้ น่าสนใจทีเดียว
Cisco Command Summary
GRUB Hard Disk Error
Review เล็กๆ Linksys By Cisco รุ่น WRT160NL Wireless-N Broadband Router With Storage Link

วันนี้ผมก็จะมา Review เล็กๆนะครับ เกี่ยวกับ Linksys By Cisco รุ่น WRT 160NL ว่าทำอะไรได้บ้างพอดีใช้อยู่ก็เลยอยากรู้ว่ารุ่นนี้ทำอะไรได้บ้างครับ
เริ่มกันเลยครับกับ Wireless-N Power
ด้วยพลังของตัว Wireless N ตอนนี้เจ้าตัว WRT160NL เนี้ยก็รองรับการใช้งานแบบ multiple user รวมถึงการแชร์ internet ในที่บ้านหรือที่ทำงานได้สบายเลยนะครับ และด้วยความเร็วของมันก็สามารถแชร์ priter ทำงานได้ดีเกี่ยวกับ gaming, video, voice-over-IP แต่ก็ยังทำงานร่วมกับ Wireless-G และ Wireless-B ได้สบายๆ อยู่นะครับ
Reliable Coverage
ด้วยตัว Wireless-N นี้จะมีเทคโนโลยี Mulitiple in, Multiple out หรือ MIMO สามารถให้เราใช้สัญญาณ wireless ได้ทั้วทั้งบ้าน
Storage for All
ความสามารถ Storage for All นี้ผม ชอบมากเพราะเราสามารถ เสียบ hard drive หรือ flash drive USB แล้วเราสามารถ share file media ได้ ซึ่ง WRT160NL นี้ ทำการ Built-in DLNA 1.5 ซึ่งสามารถทำงานร่วมกับ media server streams จนถึง PC หรือ UPnP AV digital media adapters
Connect to More
เจ้าตัว WRT160NL นี้มี port 10/100 Ethernet มาให้ 4 port กับอีก 1 port Internet ครับ
วันศุกร์ที่ 10 ธันวาคม พ.ศ. 2553
How to Install Cacti on CentOS 5.5
Cacti ก็เป็นเครื่องมือ web interface ใช้ในการ monitor network แสดงผลเป็น Graph ให้ผู้ดูแล ได้ทำงานง่ายขึ้น Cacti ก็ทำงานโดยอาศัยความสามารถของ RRDtoo ตอนนี้เราก็จะมา ทำการทดสอบติดตั้ง บน CentOS 5.5 กันนะครับ เริ่มกันเลยดีกว่า
เริ่มแรกหลังจาก install CentOS แล้ว เราก็ทำการปิด SELinux กันก่อนเพราะ Cacti อาจมีปัญหากับตัว SELinux ได้ขั้นตอนการปิด หรืออาจจะปิดใน คำสั่ง setup ของ Centos ก็ทำได้เหมือนกัน
#nano -w /etc/selinux/config
Edit:
SELINUX=disabled
install packet rpmforge-release for centos
#rpm - Uvh http://apt.sw.be/redhat/el5/en/i386/rpmforge/RPMS/rpmforge-release-0.3.6-1.el5.rf.i386.rpm
install cacti and software require.
#yum install cacti httpd mysql-server net-snmp-utils
Set Mysql and httpd daemon are start at boot follow as below: #chkconfig mysqld on
#chkconfig httpd on
#service mysqld start
#service httpd start
Create password for root for mysql
mysqladmin -u root password yourpasswod
Create database for cacti name database is cacti
mysqladmin -u root -p create cacti
note: don't forget password mysql after user command.Import script cacti.sql to mysql
#mysql -u root -p cacti < /usr/share/doc/cacti-0.8.7g/cacti.sql And create user and password for cacti to use and best to limit access to our database. # mysql -u root -p mysql mysql> GRANT ALL ON cacti.* TO cactiuser@localhost IDENTIFIED BY 'YourPasswrd';
mysql> flush privileges;
mysql> exit
Edit file /var/www/cacti/include/config.php for connect to database.
#nano -w /var/www/cacti/include/config.php
Edit :
$database_type = "mysql";
$database_default = "cacti";
$database_hostname = "localhost";
$database_username = "cactiuser";
$database_password = "YourPassword";
Add line to /etc/crontab file for cacti run every 12 minute.
#nano -w /etc/crontabAdd to end line:
*/5 * * * * cacti php /var/www/cacti/poller.php > /dev/null 2>&1
Edit cacti configuration file for apache to allow access to the web interface.
#nano -w /etc/httpd/conf.d/cacti.conf
Edit:
DirectoryIndex index.php
Options -Indexes
AllowOverride all
order deny,allow
# deny from all
allow from all
AddType application/x-httpd-php .php
php_flag magic_quotes_gpc on
php_flag track_vars on
Open firewall port 80 for web interface in iptables.
#nano -w /etc/syconfig/iptables
Add line:
-A RH-Firewall-1-INPUT -m state --state NEW -m tcp -p tcp --dport 80 -j ACCEPT
Restart the Apache web server to apply configruration.
#service httpd restart
Open browser go to http://ipserver/cacti/
Click Next and install and happy ending if no problem.