ค่า TTL ก็คือค่าการบอกว่า จำนวน hop ที่วิ่งจากเครื่องที่ ping ไปยัง hostปลายทาง ซึ่งค่าเลวร้ายที่สุดน่าจะประมาณ 40 นะ
Reply from 222.123.23.55: bytes=32 time=8ms TTL=62
TTL 64 จะบอกว่าเป็น linux, Routerเล็ก
TTL 128 จะบอกว่าเป็น Windows
TTL 254 จะบอกว่าเป็น Router ระบบใหญ่ๆ
หากสังเกตลักษณะ ที่เกิดขึ้นคือเมื่อเราทำการ ping ออกไปแล้วค่ามันไม่เท่ากับค่าข้างต้นนั้นหมายถึงมันวิ่งผ่าน Routerไป
อย่างเช่น
Pinging www.xxx.com [222.123.23.55] with 32 bytes of date:
Reply from 222.123.23.55: bytes=32 time=8ms TTL=62
หมายความว่า วิ่งผ่าน Routerไปสองตัวนั้นคือ 64-2
วันจันทร์ที่ 20 ธันวาคม พ.ศ. 2553
วันจันทร์ที่ 13 ธันวาคม พ.ศ. 2553
Linux command: What is my IP? (Public IP address)
http://www.go2linux.org/what-is-my-public-ip-address-with-linux
curl -s checkip.dyndns.org|sed -e 's/.*Current IP Address: //' -e 's/<.*$//'
วันเสาร์ที่ 11 ธันวาคม พ.ศ. 2553
Kiwi SyslogGen 2.2.0
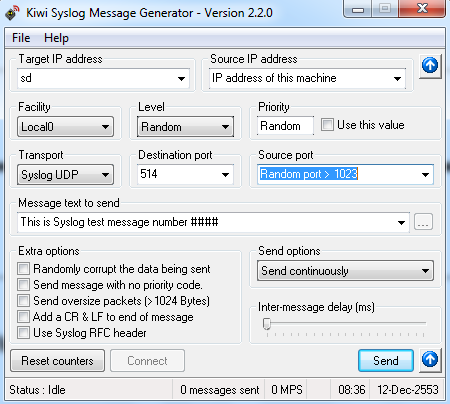
หลายครั้งที่เราทำ Syslog Server ขึ้นมาแล้วบางทีกว่าจะ test ได้ต้องเข้าไป config device ให้ pointมาที่ Server เรา แล้วก็ต้อง ทำหลายตัวด้วยซิเพื่อให้ได้ผลที่น่าพอใจ พอดีด้วยความอยากได้ Generator syslog ก็เลยลองหาดูปรากฏว่าเจอตัวนี้ น่าสนใจทีเดียว
การใช้งานค่อนข่างง่าย และมาพร้อมกับ document เป็น PDF
วิธีปรับแต่งค่าเริ่มต้น
Target IP address: เป็นไอพี Syslog Serve
Source IP address : IP address of this machine
Facility เลือกตามที่ใช้งาน: อาจจะเป็น local0
Message text to send: This is Syslog test message number ####
Send options : Send continuosusly
Inter-message delay (ms): เป็นระยะเวลา การหน่วงเวลาในการส่งแล้วแต่ความต้องการครับ
สุดท้ายก็กด Send เป็นอันเสร็จ
Cisco Command Summary
 อันนี้เป็น Link แนะนำเกี่ยว command คำสั่งของ Cisco ซึ่งเว็บก็ สรุปทำให้อ่านง่ายขึ้นนะครับ
GRUB Hard Disk Error
มีบางครั้งที่เราใช้งาน Desktop หรือ Server ที่เป็น linux แล้วเกิดข้อความ " GRUB Hard Disk Error"
นั้นแสดงให้เห็นว่า เกิดความเสียหายขึ้นกับ GRUB program ใน loader เราก็สามารถทำการแก้ไขได้ดังนี้ครับ
ใช้แผ่น CentOS 5.5 แล้ว boot เข้า Linux rescue
เข้าหน้า boot แล้วกด F2 มันจะมี menuให้เลือก พิมพ์ข้อความ "Linux rescue" แล้ว Enter
Boot ขึ้นมาแล้วให้พิพม์ตามนี้นะครับ
grub
grub>root (hd0,0)
grub>setup (hd0)
grub>root (hd1,0)
grub>setup(hd1)
grub>quit
ตัวอย่างนี้ในกรณีที่มี HDD สองก้อนครับ
Review เล็กๆ Linksys By Cisco รุ่น WRT160NL Wireless-N Broadband Router With Storage Link

วันนี้ผมก็จะมา Review เล็กๆนะครับ เกี่ยวกับ Linksys By Cisco รุ่น WRT 160NL ว่าทำอะไรได้บ้างพอดีใช้อยู่ก็เลยอยากรู้ว่ารุ่นนี้ทำอะไรได้บ้างครับ
เริ่มกันเลยครับกับ Wireless-N Power
ด้วยพลังของตัว Wireless N ตอนนี้เจ้าตัว WRT160NL เนี้ยก็รองรับการใช้งานแบบ multiple user รวมถึงการแชร์ internet ในที่บ้านหรือที่ทำงานได้สบายเลยนะครับ และด้วยความเร็วของมันก็สามารถแชร์ priter ทำงานได้ดีเกี่ยวกับ gaming, video, voice-over-IP แต่ก็ยังทำงานร่วมกับ Wireless-G และ Wireless-B ได้สบายๆ อยู่นะครับ
Reliable Coverage
ด้วยตัว Wireless-N นี้จะมีเทคโนโลยี Mulitiple in, Multiple out หรือ MIMO สามารถให้เราใช้สัญญาณ wireless ได้ทั้วทั้งบ้าน
Storage for All
ความสามารถ Storage for All นี้ผม ชอบมากเพราะเราสามารถ เสียบ hard drive หรือ flash drive USB แล้วเราสามารถ share file media ได้ ซึ่ง WRT160NL นี้ ทำการ Built-in DLNA 1.5 ซึ่งสามารถทำงานร่วมกับ media server streams จนถึง PC หรือ UPnP AV digital media adapters
Connect to More
เจ้าตัว WRT160NL นี้มี port 10/100 Ethernet มาให้ 4 port กับอีก 1 port Internet ครับ

วันศุกร์ที่ 10 ธันวาคม พ.ศ. 2553
How to Install Cacti on CentOS 5.5

Cacti ก็เป็นเครื่องมือ web interface ใช้ในการ monitor network แสดงผลเป็น Graph ให้ผู้ดูแล ได้ทำงานง่ายขึ้น Cacti ก็ทำงานโดยอาศัยความสามารถของ RRDtoo ตอนนี้เราก็จะมา ทำการทดสอบติดตั้ง บน CentOS 5.5 กันนะครับ เริ่มกันเลยดีกว่า
เริ่มแรกหลังจาก install CentOS แล้ว เราก็ทำการปิด SELinux กันก่อนเพราะ Cacti อาจมีปัญหากับตัว SELinux ได้ขั้นตอนการปิด หรืออาจจะปิดใน คำสั่ง setup ของ Centos ก็ทำได้เหมือนกัน
#nano -w /etc/selinux/config
Edit:
SELINUX=disabled
install packet rpmforge-release for centos
#rpm - Uvh http://apt.sw.be/redhat/el5/en/i386/rpmforge/RPMS/rpmforge-release-0.3.6-1.el5.rf.i386.rpm
install cacti and software require.
#yum install cacti httpd mysql-server net-snmp-utils
Set Mysql and httpd daemon are start at boot follow as below: #chkconfig mysqld on
#chkconfig httpd on
#service mysqld start
#service httpd start
Create password for root for mysql
mysqladmin -u root password yourpasswod
Create database for cacti name database is cacti
mysqladmin -u root -p create cacti
note: don't forget password mysql after user command.Import script cacti.sql to mysql
#mysql -u root -p cacti < /usr/share/doc/cacti-0.8.7g/cacti.sql And create user and password for cacti to use and best to limit access to our database. # mysql -u root -p mysql mysql> GRANT ALL ON cacti.* TO cactiuser@localhost IDENTIFIED BY 'YourPasswrd';
mysql> flush privileges;
mysql> exit
Edit file /var/www/cacti/include/config.php for connect to database.
#nano -w /var/www/cacti/include/config.php
Edit :
$database_type = "mysql";
$database_default = "cacti";
$database_hostname = "localhost";
$database_username = "cactiuser";
$database_password = "YourPassword";

Add line to /etc/crontab file for cacti run every 12 minute.
#nano -w /etc/crontabAdd to end line:
*/5 * * * * cacti php /var/www/cacti/poller.php > /dev/null 2>&1
Edit cacti configuration file for apache to allow access to the web interface.
#nano -w /etc/httpd/conf.d/cacti.conf
Edit:
DirectoryIndex index.php
Options -Indexes
AllowOverride all
order deny,allow
# deny from all
allow from all
AddType application/x-httpd-php .php
php_flag magic_quotes_gpc on
php_flag track_vars on
Open firewall port 80 for web interface in iptables.
#nano -w /etc/syconfig/iptables
Add line:
-A RH-Firewall-1-INPUT -m state --state NEW -m tcp -p tcp --dport 80 -j ACCEPT
Restart the Apache web server to apply configruration.
#service httpd restart
Open browser go to http://ipserver/cacti/
Click Next and install and happy ending if no problem.
สมัครสมาชิก:
ความคิดเห็น (Atom)